S&B Badger Works #3: AvTims Reflection

18620176_685613138289839_4073829793284161611_n
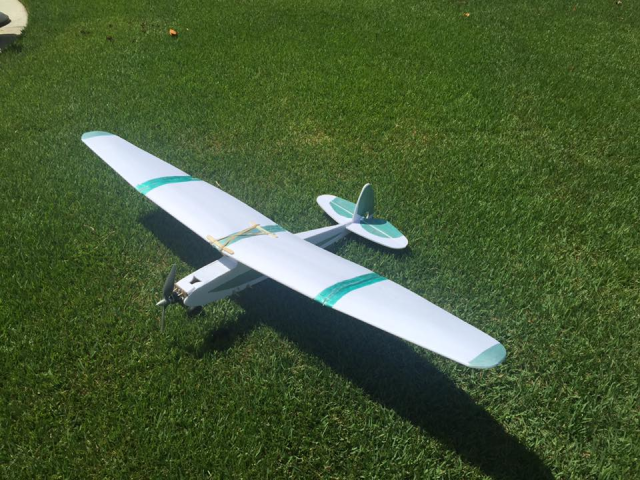
Recently AvTims, an aviation group from New Jersey, was kind enough to send us a pre-production kit for their Reflection design. This foam board aircraft is based on 1940’s free flight models, of which modern model aviation hails from. I have began putting the model together, but recently classes have had me ‘tied up.’ I plan on putting together a build video, and in the meantime you can check out my unboxing and first thoughts on the design here at our YouTube page: https://www.youtube.com/watch?v=gy-fFSDnokk

I encourage you to check out AvTims’ website, as well as their step by step build videos. Below I have linked their build video for the Reflection. All of their build videos and aircraft showcases are also on their Facebook page, which you can find here: https://www.facebook.com/AvTims/

Reflection Build Video: https://www.facebook.com/AvTims/videos/736151033236049/

The plans for all of the AvTims designs are available for free at their website (linked below). They have some cool plans, and I encourage you to check it out. Among their current plans are EDF models of F-15s and F-16s, as well as propeller driven models ranging from a high aspect ratio glider to a model of a Bonanza. All of their prop models are built around the Flite Test designed swappable power pod, so that means you can now have multiple models from different groups and head out to the field with only one or two power pods, keeping overall model prices down and potential losses low.

AvTims Website: http://www.avtims.com/

In the next few weeks our build video should be complete and we can head out to the field for a maiden. After the maiden flight (and if it survives) we will then proceed with a custom S&B Aviation paint scheme. I have great expectations for this plane, and I must say that so far I have been very impressed.

Fly safe and have fun!

Badger Works #2: Opportunities Open Up When You Least Expect

**This article also falls under Sadie’s Science Corner and Pre-Flight Check because of the uniqueness of today’s content.**

Pre-Flight Check

While I cannot delve into much detail, I can say that I will be the academic instructor for the UAV/UAS Aerospace Academy Course through the Mississippi/Southeast Regional Civil Air Patrol. Throughout this three day course I will teach cadets and senior members alike on UAV/UAS aircraft and their capabilities, learn how they are built, and learn how to fly them.

Badger Works: UAV/UAS Training with the FT Guinea Pig

guineabuild-1-png_1424198388

Guinea Pig from Flite Test

– My vision for aerospace education through the Civil Air Patrol (and other education) is based around experimentation and research with the Flite Test Guinea Pig. The Guinea Pig was designed by Peter Sripol and was later converted to a swappable aircraft by Flite Test. The Guinea Pig is a medium to large size twin engine cargo plane that is designed to be used for in-air experimentation, hence the name guinea pig. With this aircraft CAP squadrons throughout the Southeast will be able to learn how to fly as well as conduct field experiments. With the Guinea Pig people can now get hands-on and do research as well as learn how aircraft experimentation is conducted.


Sadie’s Science Corner: Experiments with the Guinea

We will be conducting several opening experiments during the academy and afterwards to see how feasible they are, and then we will branch out and eventually have an experiment manual in which will be available for download. These are a few of the first experiments we will conduct:

  • GoPro Cargo Drop- We will design a system in which the cargo deck in the Guinea will have tracks (like a real cargo plane for transporting and securing cargo) from which we can air drop and safely land a Go Pro with a parachute system.

    MC-130J Commando II activity

    Picture from Aviationist

  • JATO (Jet-Assisted TakeOff)- As seen on the Guinea review video from Flite Test, the Guinea can get JATO units using Estes rocket engines. We will do more research based around motor size as well as the angle of the motors.jato-guinea
  • Glider Tow- What I have in mind was a glider aircraft designed on Fly RC several years ago in which they designed a foamboard model of the Waco glider which was used during the invasion of Normandy. The plans are online for free download; they were originally designed for depron but can be easily transferred to DTFB (Dollar Tree Foam Board).

waco_flight_a1-310x165

  • Experiments from Project FICON (see video)


Want more aviation content? Head over to http://www.globalair.com/ and check out some other aviation blogs as well as aircraft for sale. Want more Sadie and Buddy Aviation content? Check us out on Facebook at https://m.facebook.com/sadieandbuddyaviation/ . Fly safe and have fun!


Badger Works Classified Project #1: FT Mini F4U Corsair

F4U Corsair Project

As many of you saw last week we had began building a Flite Test F4U Corsair, and have now finished the assembly! With some foamboard and a hot glue gun wonderful things can come into fruition. After traveling back to college last weekend after Fall Break I have been manufacturing and assembling many aircraft pieces… my dorm room looks like a foamboard assembly line! For any wanting to build one of these models I would recommend two things.

  1. Buy extra foamboard sheets– DTFB (Dollar Tree Foamboard) is readily available at local dollar stores and larger superstores. At Dollar Tree you can buy an entire sheet for a dollar! (As you can see in the picture below the entire tail assembly has been replaced because someone…. ok me, broke the water resistant tailplane included in the kit.
  2. Think creatively– The good thing about a foam aircraft, you can experiment! If something breaks or does not work, you can simply just cut out a new piece and try something else. Crash? Pull the broken pieces off and slap a new one on! Also, think about the paint scheme. Warbirds, for example, can be painted in many different ways and be customized for squadrons and even individual pilots.

    img_4806

    Once Sadie or Buddy breaks out the power painter she’ll be ready to tame the skies.

As for our aircraft, we have been researching what squadrons and aircraft carriers that would of had Corsairs with SB on the tail (Sadie and Buddy). From what we have found so far, aircraft with these makings would have been from VMF-516 from the escort carrier U.S.S. Salerno Bay. On October 5, Ask An Archivist Day, the National Naval Aviation Museum allowed followers on Facebook to ask questions about naval history. We asked about finding more information on the Salerno Bay, and we quickly heard from them!  They gave us the opportunity to get back with them and do some more research, and as soon as our research is completed we will share our findings with you.


Modifications

  • Plastic Canopy– I cut the top off of a 20 oz. bottle and about halfway down, and then taped the canopy outline over the plastic. Using the natural curve of the bottle it was rolled and cut, and then held together with tape as the seams were hot glued. To make the seams appear cleaner, I will use acrylic paint to cover the glue lines, which will make them appear as the normal canopy lines of a Corsair.img_4809

img_4808

Under- Wing Servos– The area to mount the aileron servos were on top of the wing and lessened the beauty of the inverted gull wing. In the kit there are four holes on each wing that you are supposed to cut between in order to create the cavity in which the servo mounted. I took a sewing needle and pushed it through the bottom part of the wing, and then cut out the square on the underside of the wing.

bottom-wing

Want to see more aircraft blogs or a website where you can check out aircraft for sale? Head over to http://www.globalair.com/ and check them out! Also, please follow our blog, and like and share on Facebook here at https://www.facebook.com/sadieandbuddyaviation/ Thanks! Fly safe and have fun!!!

Pre-Flight Check #4: Our New Aviation Project- The FT Corsair

Editor’s Note: First of all I have good news, my laptop is finally back!!! Unfortunately this post will go up a little later than normal because I just made it back home for Fall Break.

minicorsair

Picture from the Flite Test Corsair Video


For a while now I have been wanting to get back into flying remote controlled aircraft. Throughout my childhood I loved flying models, but I have not had the time nor the opportunity these last few years. Since joining Xipiter I went ahead and bought a new model so that I could knock off some of the rust before I begin flying anything expensive. The aircraft kit and equipment should arrive by Friday and will be assembling it this weekend. I bought the Flite Test Mini Corsair (as seen above). The Corsair, as well as many of their other foamboard aircraft kits and plans are part of the Swappable Series; FT introduced the Swappable Series in order to cut down costs so that more people could get into the hobby. In these aircraft the electric powerplants can be taken out and swapped between different FT Swappable aircraft.

I want to share with all exactly what equipment we are starting out with as well as our experiences with the equipment later. We will be doing build videos as well as flying videos which will be posted in the weeks to come. Now we’ll take a look at the actual equipment that we are receiving.

  • FT Mini Corsair Speed Build Kit….. $21.00 ($18.00 if you go with the non-water resistant foamboard)
  • FT Power Pack F….. $60.00
  • Flysky FS-i6 2.4GHz Radio System….. $45.19
  • XT-30 800mAh 3S 20C Lipo Battery (2)….. $10.50 ea. ($21.00)
  • Accucell S-60 AC Charger….. $31.15
  • XT-30 Charge Lead w. 4mm. Banana Plugs….. $2.08
  • Total Cost….. ~$195.00 (including shipping)

For many that are wanting to get into the hobby, or those reentering after a dry-spell might be shocked at having to drop nearly $200 just to get started. Thankfully though it is not as bad a deal as it seems. While the overall setup costs a good bit at the front end, you come out better on the other side. Many of these, like the controller and charger are one-time buys (until one stops working or you upgrade). After that to get new aircraft off the assembly line and into the air is much more reasonable. With needed items such as the kit (FT offers the free plans for download online if you won’t mind cutting the plans yourself out of DTFB*), servos, and another receiver compatible with your radio each new aircraft’s production cost should come in somewhere below $50.00. Compare that to several hundred each for pre-made aircraft! I believe the FT foamboard designs also help inspire people’s creativity; you can customize your FT aircraft with paint schemes and modifications of your own that will give the model a personal spin.

I would encourage everyone to go check out the aircraft and other rc flying equipment available from Flite Test at http://store.flitetest.com/

Later on this week we will post a list of the modifications we will be making to the kit as well as more in-depth coverage of our project.

Thanks for checking out this week’s blog! Want to see more aviation related articles or aircraft listings? Just head over to https://www.globalair.com/ and check out some amazing aircraft and look at other aviator’s blogs.

*DTFB- Dollar Tree Foamboard: The type of foam material used in FT builds. It is sold in sheets and is readily available at local Dollar Trees and other convenience stores.